Looking forward to put it back on the engine (hopefully I will remember how to).
Engine rebuild
Moderators: the2knights, Highway Rider
-
jorgeno
- Cruiser

- Posts: 82
- Joined: Wed Apr 12, 2017 5:05 pm
- 7
- Current bike(s): Kawasaki ZG1300 1986
Kawasaki ZN1300 1986
Suzuki GS1000G 1982 - Has liked: 0
- Been liked: 1 time
Re: Engine rebuild
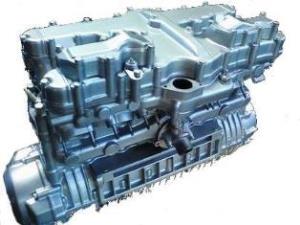
Finally, parts back from the machine shop  Nice, nice, nice
Looking forward to put it back on the engine (hopefully I will remember how to).
Looking forward to put it back on the engine (hopefully I will remember how to).
-
Van Voyager
- Grand Tourer

- Posts: 431
- Joined: Wed Aug 30, 2017 8:01 am
- 6
- Current bike(s): 1986 Kawasaki ZN1300 Voyager
- Has liked: 43 times
- Been liked: 37 times
-
jorgeno
- Cruiser
- Posts: 82
- Joined: Wed Apr 12, 2017 5:05 pm
- 7
- Current bike(s): Kawasaki ZG1300 1986
Kawasaki ZN1300 1986
Suzuki GS1000G 1982 - Has liked: 0
- Been liked: 1 time
Re: Engine rebuild
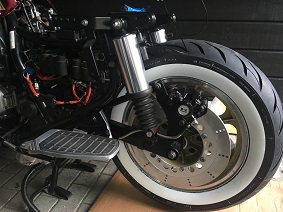
Today I had some spare time to work on the bike. Replaced the mechanical seal, put on a stainless steel water pump shaft, new piston rings, base gasket and so on. It was not difficult to fit the cylinder block on pistons, but I forgot to mount the water pump drive gear before installation. Had to take the block up and then I lost a nut down the crankcase 
Luckily I found it in the oil pan. I also installed the new liska idle gear. Looking good. Next operation will be the cylinder head
Luckily I found it in the oil pan.
- Attachments
-
-
-
-
-
-
-
-
jorgeno
- Cruiser
- Posts: 82
- Joined: Wed Apr 12, 2017 5:05 pm
- 7
- Current bike(s): Kawasaki ZG1300 1986
Kawasaki ZN1300 1986
Suzuki GS1000G 1982 - Has liked: 0
- Been liked: 1 time
Re: Engine rebuild
 Cylinder head back on the bike. Camshafts timing is correct and everything turns smoothly.
 - Attachments
-
-
cushman eagle
- King of the Road

- Posts: 1941
- Joined: Sat Jan 22, 2011 10:08 pm
- 13
- Current bike(s): '99 Kawasaki Voyager 1200
1958 Cushman Eagle restoration has been finished,and have put 3030 miles on her! - Location: Orrville,Ohio
- Has liked: 812 times
- Been liked: 273 times
Re: Engine rebuild
It looks like a very thorough rebuild
Very nice and thanks for the pictures!
Very nice and thanks
'99 Voyager VXII,'58 Cushman Eagle
-
ekap1200
- Master Fabricator

- Posts: 1363
- Joined: Fri Jul 04, 2008 12:54 pm
- 15
- Current bike(s): 2000 voyager end of year total. 108.634
- Location: Williamstown, New Jersey
- Has liked: 30 times
- Been liked: 134 times
Re: Engine rebuild
I have been following this post, that is very good looking machine work.
"Its not bad if you don't know something, but when you don't know you don't know; That's when your in trouble". Joe Place 1912-2008 (my grandfather)
-
jorgeno
- Cruiser
- Posts: 82
- Joined: Wed Apr 12, 2017 5:05 pm
- 7
- Current bike(s): Kawasaki ZG1300 1986
Kawasaki ZN1300 1986
Suzuki GS1000G 1982 - Has liked: 0
- Been liked: 1 time
Re: Engine rebuild
The machine shop did a great work. They had to replace two of the valve guides, because they where broken off. Furthermore seated all the valves (none of them were seating), replace circlips (just a matter of time before valves could fall down into cylinder), pressure testing and cutting down 0.2mm off the cylinder head. It was also necessary to replace intake camshaft (from eBay).
They said i should notice a significant difference now :-)
They said i should notice a significant difference now :-)
-
jorgeno
- Cruiser
- Posts: 82
- Joined: Wed Apr 12, 2017 5:05 pm
- 7
- Current bike(s): Kawasaki ZG1300 1986
Kawasaki ZN1300 1986
Suzuki GS1000G 1982 - Has liked: 0
- Been liked: 1 time
Re: Engine rebuild
Finally ready to start it. I discovered that the battery was weak but with some extra power it started right up at first attempt
What a relief
Sounds much nicer than before, but would not idle by itself. I warmed up the engine and bleed the coolant system. When the engine is cold I’m going to check/torque the cylinder head bolts. Tonight I’m going to celebrate this with a cold beer
Sounds much nicer than before, but would not idle by itself. I warmed up the engine and bleed the coolant system. When the engine is cold I’m going to check/torque the cylinder head bolts. Tonight I’m going to celebrate this with a cold beer
-
cushman eagle
- King of the Road
- Posts: 1941
- Joined: Sat Jan 22, 2011 10:08 pm
- 13
- Current bike(s): '99 Kawasaki Voyager 1200
1958 Cushman Eagle restoration has been finished,and have put 3030 miles on her! - Location: Orrville,Ohio
- Has liked: 812 times
- Been liked: 273 times
Re: Engine rebuild
Good for you, jorgeno,it is always a good feeling to hear a new rebuild fire up for the first time, and I am a firm believer in head retorques !jorgeno wrote: ↑Sat Nov 02, 2019 2:50 pm Finally ready to start it. I discovered that the battery was weak but with some extra power it started right up at first attempt
IMG_7063.MP4
What a relief
Sounds much nicer than before, but would not idle by itself. I warmed up the engine and bleed the coolant system. When the engine is cold I’m going to check/torque the cylinder head bolts. Tonight I’m going to celebrate this with a cold beer
'99 Voyager VXII,'58 Cushman Eagle
-
jorgeno
- Cruiser
- Posts: 82
- Joined: Wed Apr 12, 2017 5:05 pm
- 7
- Current bike(s): Kawasaki ZG1300 1986
Kawasaki ZN1300 1986
Suzuki GS1000G 1982 - Has liked: 0
- Been liked: 1 time
Re: Engine rebuild
Thanks cushman eagle and yes. It was fantastic to hear the engine running again :-) Now the bike is prepared for long time storage and I’m waiting for the summer. I have learned so much. I will now continue my work on my ZG1300
-
jorgeno
- Cruiser
- Posts: 82
- Joined: Wed Apr 12, 2017 5:05 pm
- 7
- Current bike(s): Kawasaki ZG1300 1986
Kawasaki ZN1300 1986
Suzuki GS1000G 1982 - Has liked: 0
- Been liked: 1 time
Re: Engine rebuild
I don’t know, what parts are you thinking off? The seat?
The bike was in bad shape when I bought it, but now it is good. If the odometer is correct the engine has been running for 127000 miles
The bike was in bad shape when I bought it, but now it is good. If the odometer is correct the engine has been running for 127000 miles
-
Me Again
- King of the Road
- Posts: 1750
- Joined: Sun Feb 24, 2008 4:27 am
- 16
- Current bike(s): 1988 1300 Voyager
- Location: Wisconsin
- Has liked: 0
- Been liked: 223 times
Re: Engine rebuild
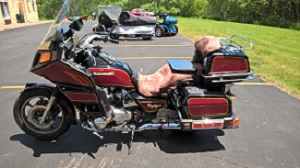
Picture looked like a black gas tank.
Upon review it looks like a red one.
I also thought you had a chrome stator cover but was mistaken on that also.
Upon review it looks like a red one.
I also thought you had a chrome stator cover but was mistaken on that also.
-
jorgeno
- Cruiser
- Posts: 82
- Joined: Wed Apr 12, 2017 5:05 pm
- 7
- Current bike(s): Kawasaki ZG1300 1986
Kawasaki ZN1300 1986
Suzuki GS1000G 1982 - Has liked: 0
- Been liked: 1 time
Re: Engine rebuild
Winter is coming and it’s dark here in Norway. My cellphone cam isn’t the best. So it could look like a black one, but it is a red 86 model :-)
-
jorgeno
- Cruiser
- Posts: 82
- Joined: Wed Apr 12, 2017 5:05 pm
- 7
- Current bike(s): Kawasaki ZG1300 1986
Kawasaki ZN1300 1986
Suzuki GS1000G 1982 - Has liked: 0
- Been liked: 1 time
Re: Engine rebuild
Hi
Started the bike today and did a little test ride. I am happy to discover that the transmission now works perfect and the engine sounds much better than before the rebuild. That`s the positive side.
The negative side is that the idling is unstable and the throttle response is sluggish. It was like this before put it into winter storage. I thought a bad vacuum sensor could cause that, but I replaced it and nothing changes.
I suspect that the vacuum synchronization could be out of position. Readings from manifolds #1 and #2 20 cm Hg, #3 and #4 10 cm Hg, #5 and #6 16 cm Hg.
I`m not sure that I did the inspection right. The manual says .." pull off the vacuum hoses from the 3 and #4 manifolds sliding the hose clamps out of position"? And then what? Are they gonna be open when I perform readings from manifolds 1,2, 5 and 6? Or close them with a hose? Or do you adjust manifolds 1 and 2 to 3 and 4? Since they are the master manifolds?
Can somebody please explain better how to synchronizing engine vacuum?
Thanks
-
Van Voyager
- Grand Tourer
- Posts: 431
- Joined: Wed Aug 30, 2017 8:01 am
- 6
- Current bike(s): 1986 Kawasaki ZN1300 Voyager
- Has liked: 43 times
- Been liked: 37 times
Re: Engine rebuild
Watching. Sorry, don't know the answer to your question but interested in the answer as I'm probably going to have to do this myself at some point as I think it's probably overdue.
I thought that with a KZ1300 the 'two barrel' carbs could only be adjusted in pairs, so only 3 vacuum ports in total were measured and 2 adjustment points (1 fixed and two adjustable). It hadn't occurred to me that with FI, vacuum on all 6 ports can be measured and 5 adjusted. Is the procedure in the manual adjusted because they assume a common 4-port vacuum gauge is being used to sync 6 cylinders?
I thought that with a KZ1300 the 'two barrel' carbs could only be adjusted in pairs, so only 3 vacuum ports in total were measured and 2 adjustment points (1 fixed and two adjustable). It hadn't occurred to me that with FI, vacuum on all 6 ports can be measured and 5 adjusted. Is the procedure in the manual adjusted because they assume a common 4-port vacuum gauge is being used to sync 6 cylinders?
-
jorgeno
- Cruiser
- Posts: 82
- Joined: Wed Apr 12, 2017 5:05 pm
- 7
- Current bike(s): Kawasaki ZG1300 1986
Kawasaki ZN1300 1986
Suzuki GS1000G 1982 - Has liked: 0
- Been liked: 1 time
Re: Engine rebuild
You are right Bucko, I think it`s only necessary to adjust manifold 1, 3 and 6. I will check it out and report how it goes :-)
-
HMB Don

- Past Board Member

- Posts: 756
- Joined: Thu Apr 10, 2008 1:44 am
- 16
- Current bike(s): 2012 Voyager 1700
- Location: Wilmington, NC
- Has liked: 0
- Been liked: 81 times
Re: Engine rebuild
Jorgeno
Very good job, thanks for posting including all of those pictures, the engine does sound good in the video. Looking at the pictures of the endless chain, for as many miles that were on the engine they looked very good. On my CB500 I replaced the endless chain twice at 20 k each time it looked worse then yours. Showing that Kawasaki build a heavy duty engine.
Wanted to know if you installed new main bearings? The old pistons I saw in the pictures it looked like you reused them? Wondering what the piston clearance was after the cylinder was honed? Vacuum leaks are so simple and yet the hardest things to pin point. On my 12 I was also have low power and Idle problems. I called Carl and he said Don you have a vacuum leak! Of course I didn't want to believe, but Carl was right the leaks were in the rubber intake boots. I replaced the new allen head screws and the problem like yours was gone. Happy riding this summer.
Again very good Job
Don Medina
NorCal Voyagers Club
2012 Voyager 1700
NorCal Voyagers Club
2012 Voyager 1700