Got a tech tip for Vulcan Voyager 1700's from your personal experiences, or one complete with pictures and instructions, here's where to post it. You can also ask about tips or procedures here.
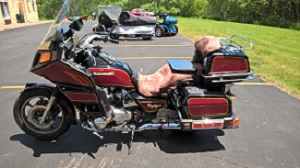
I can now remove/replace the trunk in as much time as it takes to turn four bolts and plug in the tail light and antenna connectors. I happily now have a "quick change" trunk and can easily convert my Voyager to this solo-type look. It might not be perfect (lack of trim over the part where the bracket bolts on to the frame), but it is good enough for me.
Here's what it looks like with the trunk replaced. I personally like the look of the bare trunk bracket better:
I can post a set of instructions if anyone is interested.
As for the seat issue, I am having trouble setting back as far as I would like to on the stock seat. I thought about cutting away part of the foam but was not sure how it would work. I have had three different bikes with Mustang seats and they were outstanding for all day comfort, so that is why I asked about them on the Voyager.
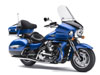
The blue Voyager looks great to me without the tourbox so I would like your instructions. I may still buy the Vaquero antenna mount to solve that issue.
Jim
Blue Knights Texas V
2010 VV 1700 Red/Black
(Wife's) 2010 H.D. Tri-Glide Ultra
Here's the procedure. The reason it seems a bit complicated is that the various plastic chromed trim pieces overlap each other, so you have to take lots of stuff off to get to the ones you need to remove. (Disclaimer: I am not legally responsible for anything that happens in the process of, or as a result of, doing this mod.) I hope my descriptions of parts are clear.
1. Remove the plastic floor pan from the trunk. Press in the center of the 4 plastic "pop rivets" and hope the pan comes out without breaking the rivets (I broke one).
2. Remove the three philips head bolts inside the trunk holding the antenna mount, and then remove the bottom cover of the antenna mount (one philips head bolt). Then disconnect the antenna wire (held on with an 8mm nut) and pull it through the hole and into the trunk.
3. Unplug the tail light connector, inside the trunk.
4. Remove the tail light; 4 black philips head screws inside the trunk, and four chrome philips head bolts outside underneath.
5. Unbolt the trunk from the trunk bracket. Four 12mm bolts inside the trunk. Pull the antenna and tail light wires through the hole and out of the trunk. There is a clip (or two) you will have to remove / open to get the wires completely free. You can roll these wires up together and stash them under the rider's seat. If I recall correctly, at this point the trunk itself will be free from the bike.
6. Remove the chromed plastic trim from the bottom/sides of the trunk bracket "shelf." Two chrome philips head bolts on each side connecting it to the bracket, and three chrome philips head bolts on each side connecting the trim to the bracket side trim.
7. Remove the trim that covers the sides of the bracket (covers the support arms). Three allen head bolts on each side holding the trim to the frame, and one screw on each side underneath the rider's seat (you'll have to remove to seats to get to these screws). Once you have this off, you may wish to use one of the allen head bolts on each side to secure the top of the plastic chromed filler piece that runs downward between the saddlebags and the bike.
8. Locate the four bolts that connect the trunk bracket to the frame. Two 12mm bolts on each side. Hold the trunk bracket and do not let it fall and scratch your bags or fender! You should how have a clean rear end on your Voyager.
It should be clear as you proceed which piece needs to come off to get to the next piece, etc. Think of it as working from the top down. The goal of this first part is to get the trunk, trim pieces, and trunk bracket off the bike.
To make it a "quick connect" trunk:
9. Reattach the antenna mount to the trunk (three philips head bolts). Remember to include the antenna grounding strip (or whatever it is) with the bottom bolt.
10. Reattach the bottom/side pieces of trim to the trunk bracket with chrome philips head bolts; two on each side. These bolts enter from the top of the outermost part of the bracket (on each side).
11. Bolt the bracket to the trunk. Remember to include the antenna grounding strip (or whatever it is for) with the left rear bolt.
12. Reinstall the tail light.
Now you should have a complete trunk (with side/bottom trim pieces and tail light) attached to a trunk bracket with bare sides -- the trunk bracket support arms are exposed. To attach the whole thing to the bike, just set it over the back of the bike and line up the four 12mm bolt holes. Install the bolts, run your wires through the trunk and connect the tail light and antenna. You should have four small allen head bolts and six chrome philips head bolts left over (these connect the bracket side trim to the frame and upper trim pieces).
Mr Clean wrote:Please post instructions on how to do it. I'm wondering how you addressed the antenns
The antenna wire is rolled up and stashed under the riders seat along with the tail light wire. Surprisingly, I still get decent reception from it. Perhaps those of us who are interested in this "mod" can figure out some better solution (second antenna mount somewhere?).
I have removed my trunk as well. When it is removed, along with the chrome trim, the side bag or "pannier" frames are exposed, as well as the frame pieces that hold the passenger seat. Also, you lose the nice big LED array that adds visibility for the tail/brake lighting. Did you do anything to mitigate this?
I built some trim pieces that cover the side bag frame that will have LED light strips connected through a Skene Design control module that flashes the brake light and adds a "conspiquity" flicker to the tail light function. When the trim pieces come back from the powder coater, and I put the whole thing together, are you interested in seeing it? I can post pics of it on my "Making a Voyaquero" thread. All can be removed to change the bike back to the standard configuration, but I would keep the control module to operate the stock LED array on the trunk.
"Better to be silent and be thought a fool, than to speak and remove all doubt".