Hello everyone! As of today, we have 90 registered! That's going to be a great turn out!
Just a reminder that rally registration closes on May 9 so that we can place our t-shirt order for the rally.
If you are coming, but have not sent in your registration, do it TODAY or TOMORROW!
After that, we will not accept any orders for t-shirts. We order a few extra of the most common sizes for the rally. You can only get what is available.
Have you all made your hotel reservations? If not, do it NOW! If our blocked rooms are full at Laquinta Inn, you'll have to find other lodging.
See you all soon!
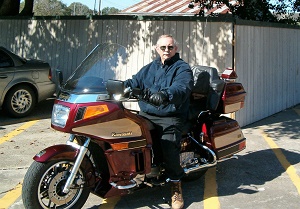
So I finally finished that paint job I posted about way back when. It took about 80 hours of epoxy/glass cloth to get all 29 pieces of my spare 1993 plastic ready for paint since there were a lot of cracks and missing bracket ears.
Then off to the auto painter for 2 sessions of spraying the red, then blanking out the red and spraying the black, then unmasking everything and clear coating the lot.
It was definitely not for the faint of heart keeping the original decals and getting the paint to end up exactly where the factory paint did alongside the decals, but with careful sanding it worked out well. I must recommend 3M's 1/8" Fine Line vinyl masking tape for it's ability to conform to the tight radii of the decal corners and stay there.
Anyhow, while a purist and others may not like the change in colour, here are some pics of the finished product: a hybrid coloured 1987.
Dave
You did an extremely great job with the fine detail of your paint job I do not have the patience to do that good of a job
Tony,that is only a vacation ride away
Thank you gents for the kind comments.
Being an unused set of plastic I had the good fortune of being able to spread the work out during my spare time over a month or so and still have my bike to use.
The most tedious part was indeed the sanding next to the decals. I started with 320 wet/dry close to the decal and worked up to 600 w/d sandpaper directly next to the decal, all the while trying to not sand where the decal was.
To aid in not sanding where the decal was, I used regular green 1/4" masking tape but even with this the occasional sandpaper rub would inevitably land where the decal was and abrade the clear coat covering the decal. Thankfully there was enough depth of clear coat so my minor sandpaper marks were absorbed by the new clear coat I applied.
Would that I was a little younger with an iron butt and fewer responsibilities at home here, I would enjoy attending an AVA rally.
Perhaps when things get a little less time consuming here I may just leisurely poke along the side roads of our marvelous terrains and show up at one.
Dave
Very nice! That's a lot of bike. (Interesting -- pretty much the exact opposite of what I had in mind.)
Maybe Eastport, ME would be easier on your bike's seat? I hope to be there in a few weeks ... pending how my own bike's seat is doing ;)
Nails, krasmu and Mr Jensee;
Thanks to you for the kind comments.
Nails I did see on eBay where a guy was selling what I would call a rat rodded Voyager XII. He had removed most of the plastic and formulated only what he needed out of what looked like non skid bridge deck. I suspect it was plastic. The faux tank was still there along with a lot of frame showing and trick mufflers, megaphone style I think.
No bags, trunk, cowlings, side covers and I believe he used a ZX1100 front end minus the plastics.
It was painted a flat khaki colour if memory serves me right.
I have to wonder but I bet it probably felt as light as heck when up to speed what with all that weight removed.
Thanks again,
Dave
Yeah, I'm not into Rat, but I did want to get rid of everything I didn't want. As an example, I couldn't see the point of carting a radio around if I never was going to turn it on. I'd rather have a plugged hole, even if the plug is obvious. I want a good riding experience.
You went for bling, and that's cool. Your bike is totally show impressive.
I'm actually thinking of mods for solo touring. Like replacing the trunk with a narrower but longer one, mounted way-forward (ditch the passenger seat) and lower (to backrest the pilot). Or somehow extending the side bags forward (ditch the passenger floorboards), maybe replacing the front latch with a hinge (given a narrower top box), and then grafting on something to the front of the bag below that hinge (maybe the bottom of some little aftermarket donor bag). The ABS is easy; and I think the stretch look might work, the mass would be more centralized, and it could be less cluttered (like long poles in those long bags). But those stout bars in front of the saddlebags have proven useful.
If wishes were fishes ... and right now I'm sure it'd be best to sort mine the way it is and experience how it works as designed. And on this blog I'm generally committed to say what I did rather than blather about what I want to do.


 I do not have the patience to do that good of a job